
Introduction
In my previous post Intentional Logging – Part 1 – Introduction, I introduced the requirement of Intentional Logging as a practice in your environment. In this post, I explain the first step, which is the customization you need in Dataverse and PowerApps, and you can leverage Modern Commands using Power Fx for it.
Here are the steps:
1. Define the Log Table
You need to create an activity, in order to be able to show it in the Timelines.
1.1.Create columns
Here are the columns you need:
- Log Type that is a choice column:

By clicking on the Edit Choice button, you add the following choices. (Please note that the number values might be different for you, keep them as it is which is based on the publisher of your solution.)

2. Another Log Type field which is a Text field. (You need to create it to be used inside the Card form. It will have the same value as the choice field when you create the log). I recommend choosing 15 characters in length.
3. URL with type text that is supposed to keep the URL for more details. For example the URL of your cloud flow run, as in the previous blog.

Now we are finished with the custom columns. We will also use Subject, Description, Priority, and Regarding, which are out-of-the-box columns of a custom activity.
1.2. Choose the proper icon
Another important point is to choose an icon for your log Table. My recommendation is to choose a colorful icon that is easily distinguishable in Timeline.
I used this fancy icon which was created by juicy_fish on flaticon.com.

If you don’t know how to change your table icon, it is explained in this blog post, written by Linn Zaw Win.
1.3 Configure Card Form
Now, you configure how you want your log to be shown in Timelines. For that, you need to configure its Card form.
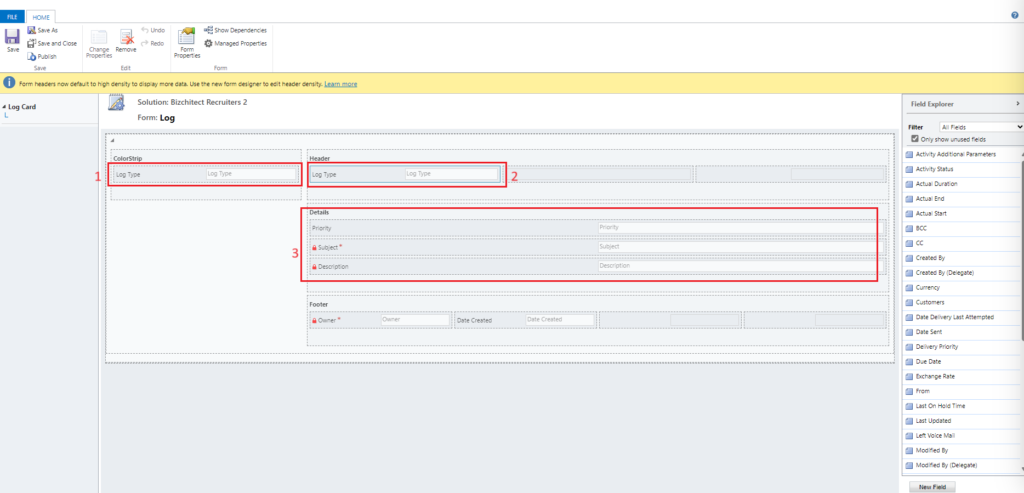
- This is the Log Type choice field.
- This is the Log Type text field. You need a text field because custom choice field are not shown in timeline at the time of writing this blog.
- You use the out-of-the-box fields Priority, Subject, and Description.
1.4 Create More Details button
The first step is to open your model-driven app in edit mode and add your Log table in the pages. (After you configured the button, you can remove the Logs from your navigation).
You need to right click on the Logs view and choose Edit command bar, and then Edit in new tab or Edit.
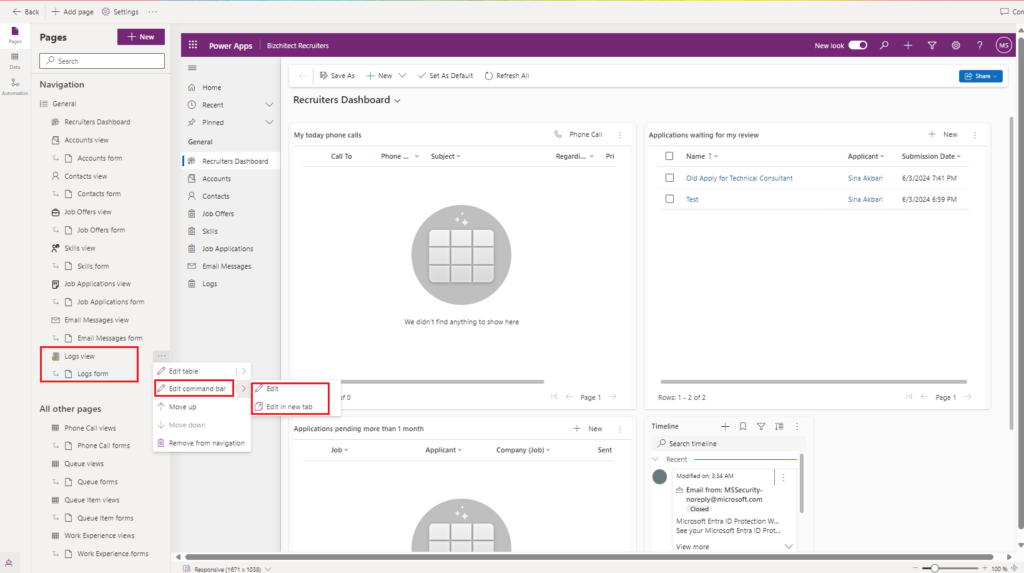
Then, choose the Main form in the following dialog, and click Edit.

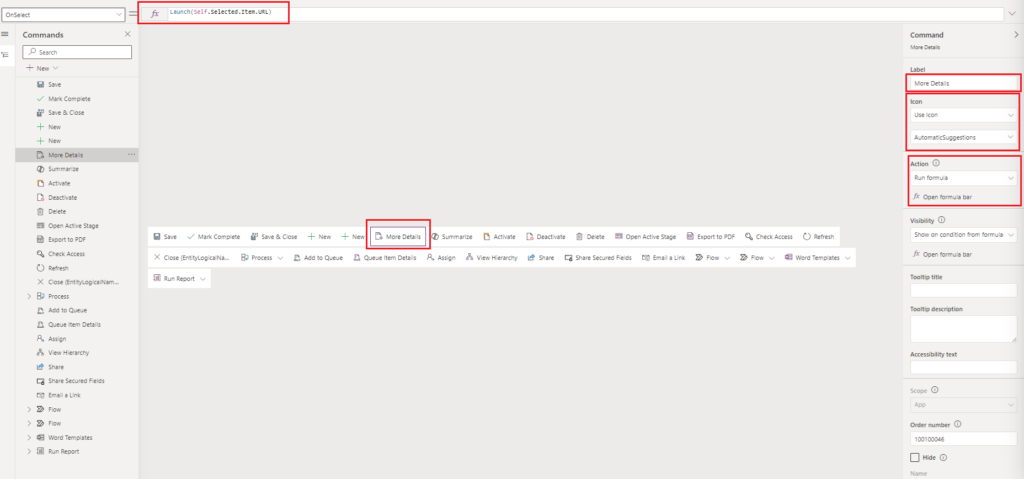
Now, by clicking on the New button and then choosing the Command option, a NewCommand button is created for you.

Then, you need to click on the NewCommand button, and change the label to More Details, and use the icon that you like. I chose the out-of-the-box “AutomaticSuggestions” icon.
Moreover, you need to choose the Run formula as the action and write Launch(Self.Selected.Item.URL) as the Power Fx formula. This will open the URL inside the URL column of the log record in a new tab.
2. Configure other tables to accept logs
The next step is to configure the tables. In my example, I showed the log in the Job Offer Table. So, here I show you how to do it. You might need to do the same steps but in your own table(s).
2.1 Configure Table schema
First of all you need to make sure your table will accept activities, by choosing the following schema option, then Save and then Publish it.

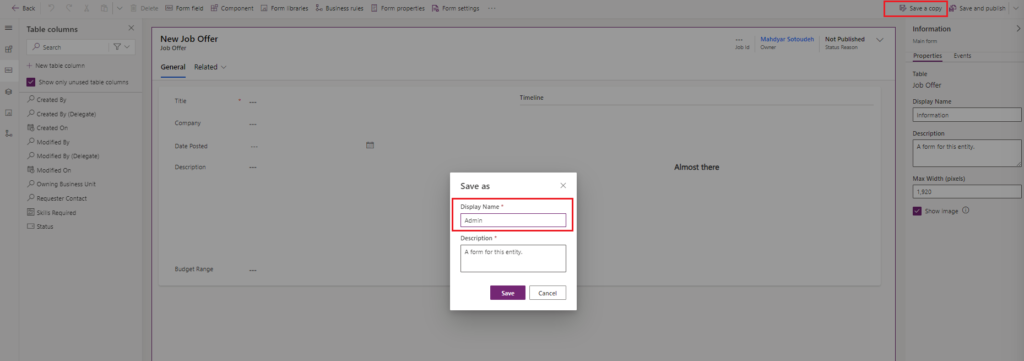
2.2 Create and configure Admin form
You just need to open your main form that is being used in your model-driven-app, and Save a copy of it and write Admin as the Display form.
2.3 Configure Admin form Timeline
After the Admin form is created, you click on the Timeline if there is any, or at first add a timeline component and then configure it as follows. In the activities choose Log and enable it for the timeline and choose the card form we configured in step 1.3 as the form.
It is better to configure the sorting of activities to be based on Date created. It is helpful for troubleshooting.

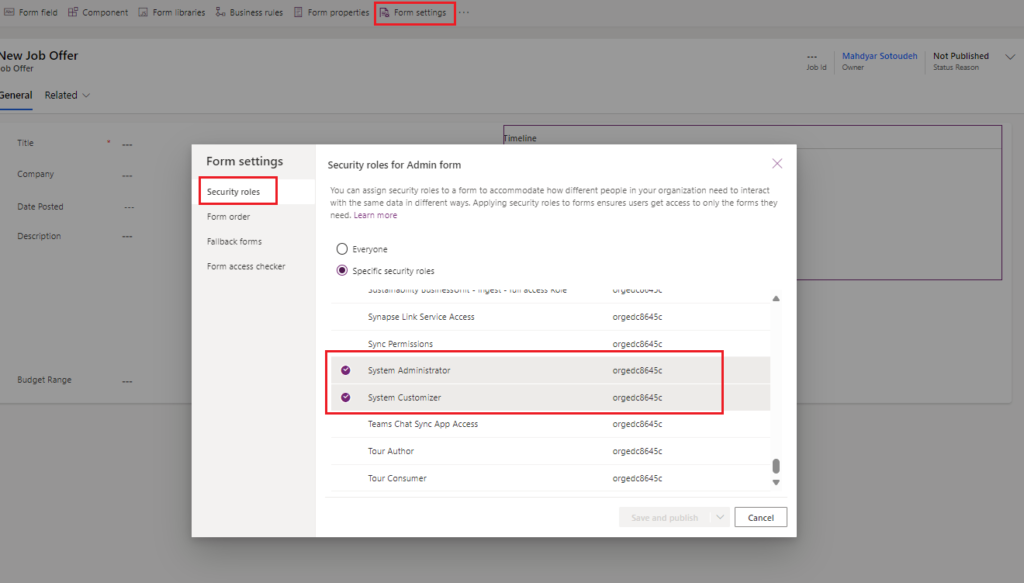
2.4 Configure Admin form security
In order to not let other users have access to the admin form, you need to click on the Form settings, and then in the Security roles tab, choose Specific security roles that you want this form to be available for them. In my example I just configured System Administrator and System Customizer.
3. Result
That was all you need to configure. If you create a log for your table, and open the Admin form, you can see something like this. By the way, in my next blog, I will explain how you can create a cloud flow to create the log whenever needed.


4. Next steps
With the simple configuration explained here, you established the foundation. Now, you need to implement some ways to create the log. In my next blog post, I will explain how you can create the log using a Power Automate child flow.

Pingback: Intentional logging – Part 1 – Introduction - bizchitect